序言
微信登录常见方式
平常大家见到过最多的扫码登录应该是 开放平台网页登录 大概形式就是:点击微信登录后会出现一个黑页面,页面中有一个二维码,扫码后可以自动获取用户信息然后登录,但是这种方式需要申请开放平台比较麻烦。如图

利于推广方式
另外一种扫码登录方式只需要一个微信服务号就行,大概流程是:点击微信登录,网站自己弹出一个二维码、扫描二维码后弹出公众号的关注界面、只要一关注公众号网站自动登录、第二次扫描登录的时候网站直接登录,这种扫码登录的方式个人觉得非常利于推广公众号。
流程如下:
一、获取二维码
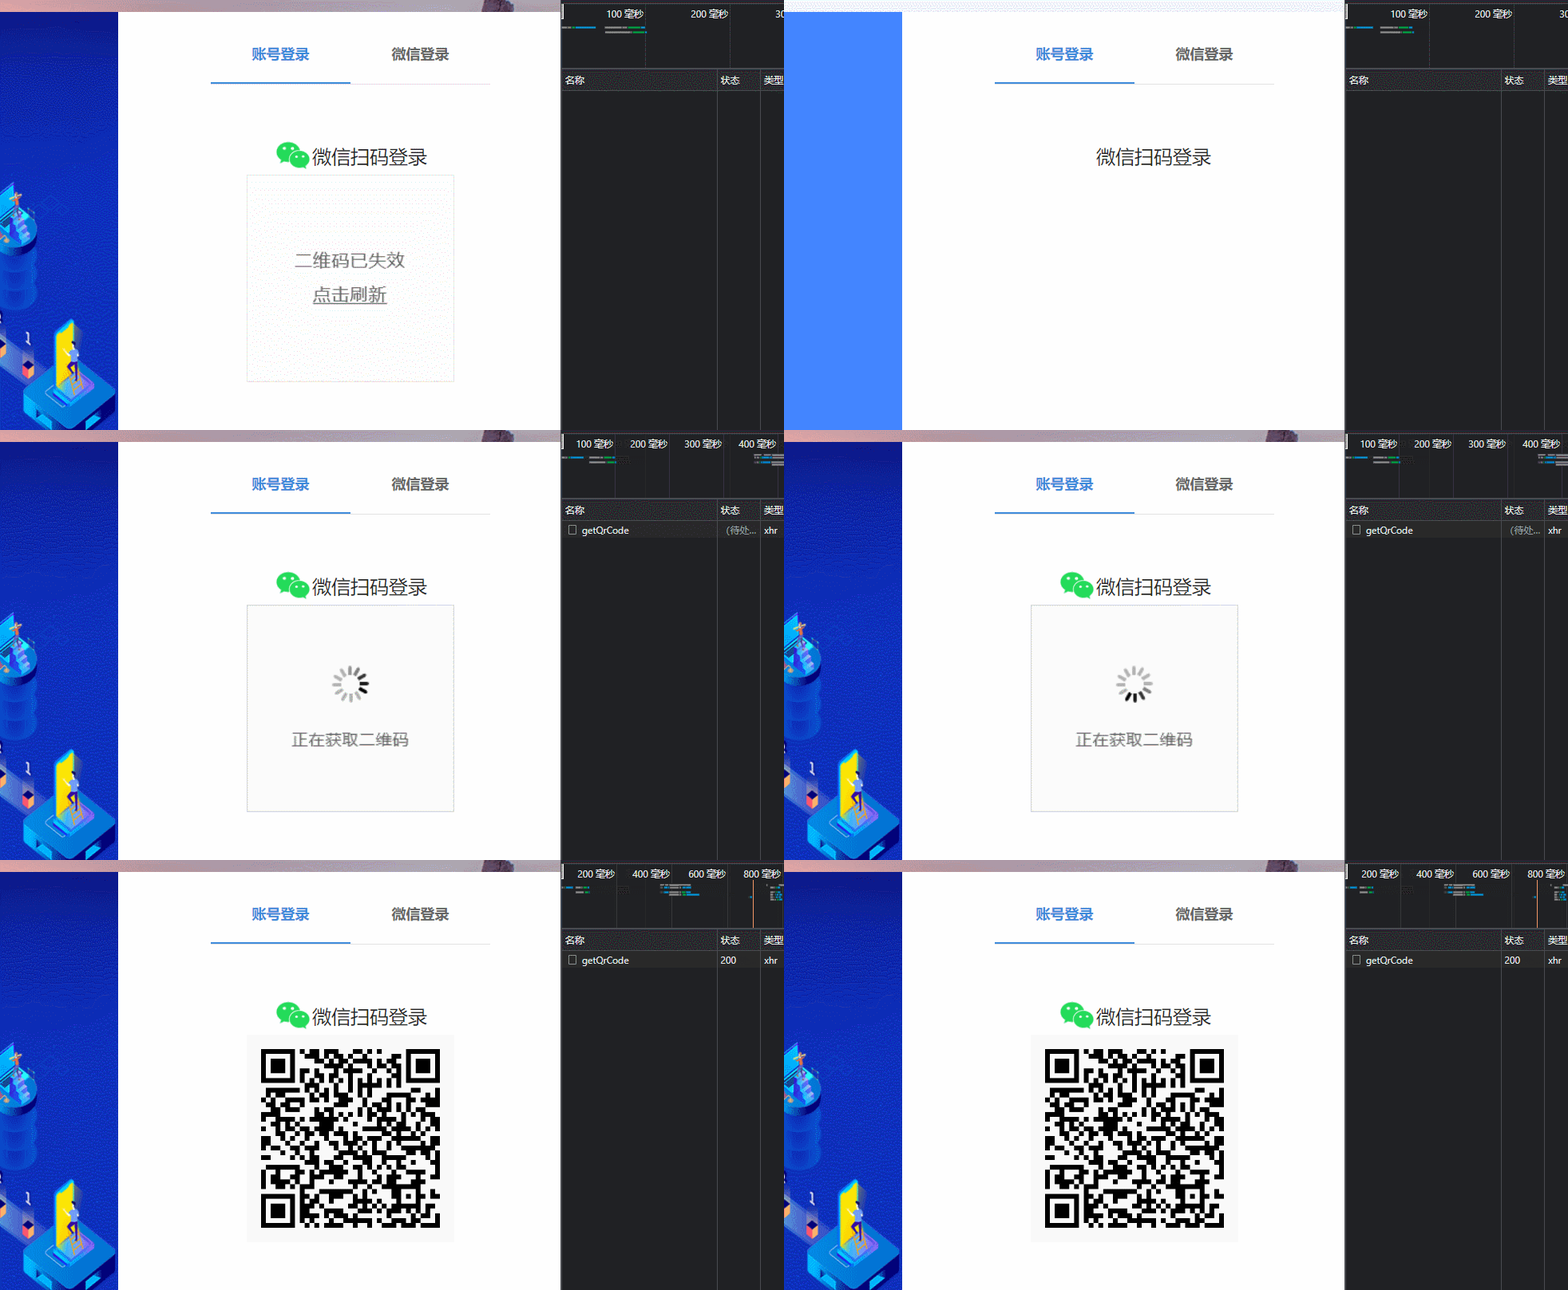
二、前端轮询接口,查看扫码情况
未扫描:
扫描成功: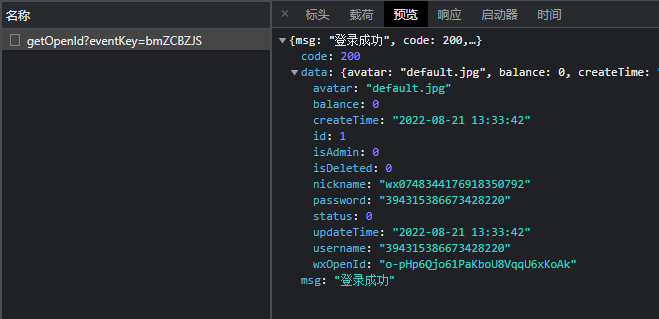
三、扫描二维码
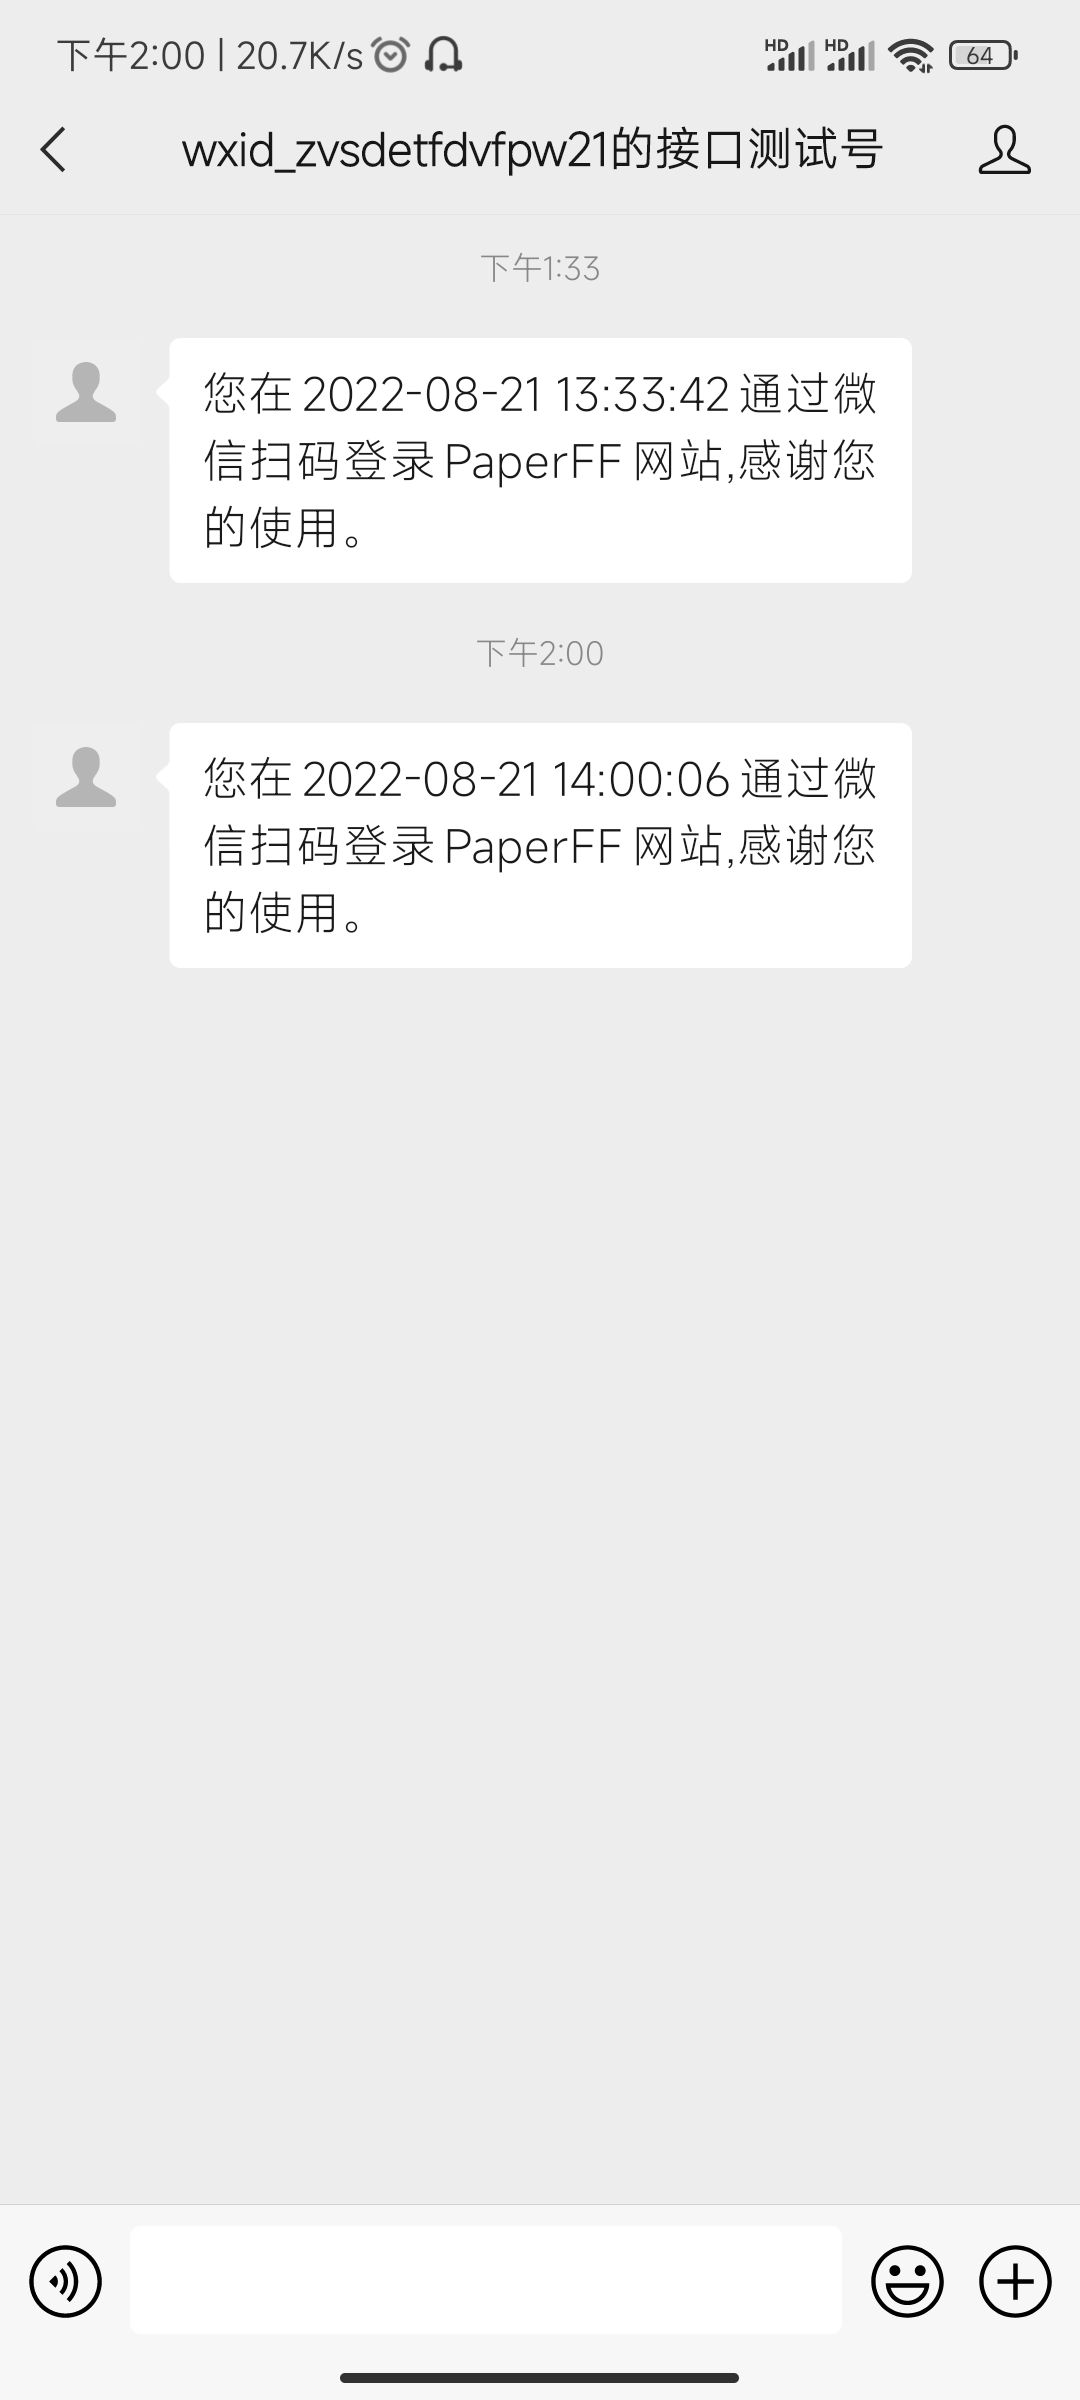
方式一:利于推广方式
基本流程
使用微信扫码登录 我们肯定要先来了解一下扫码登录的基本流程啦
- 前端首先向服务端发送一个请求,用来获取二维码的url和唯一随机数(用UUID即可,这个随机数可以理解为这个二维码的key值,一一对应,所以尽量要用唯一的)
同时服务端要记录这条随机数(存redis和其他数据库均可,找个地方记录下来) - 前端自从收到二维码和随机数后,展示二维码,并轮询一个检查二维码状态的接口(用来判断用户是否扫码并确认)很关键的一步
- 客户扫码并确认后,会回调给服务端一个请求,服务端就能拿到对应的二维码的key(之前产生的随机数)
- 前端轮询中 发现二维码状态值变为用户扫码已确认的值后,向后端发送业务请求(登录。。。。)
前提准备
导入依赖
        <!-- 对接微信登录 开始 -->
        <dependency>
            <groupId>com.github.binarywang</groupId>
            <artifactId>weixin-java-mp</artifactId>
            <version>4.3.8.B</version>
        </dependency>
        <!-- 对接微信登录 结束 -->
        <!-- 读取配置文件 -->
        <dependency>
            <groupId>org.springframework.boot</groupId>
            <artifactId>spring-boot-configuration-processor</artifactId>
            <optional>true</optional>
        </dependency>
        <!-- 网络请求框架 -->
        <dependency>
            <groupId>org.apache.httpcomponents</groupId>
            <artifactId>httpclient</artifactId>
        </dependency>
        <!-- fast json -->
        <dependency>
            <groupId>com.alibaba</groupId>
            <artifactId>fastjson</artifactId>
            <version>2.0.10</version>
        </dependency>
        <!-- END fast json -->
网络请求工具类
util/HttpClientUtil.java
public class HttpClientUtil {

    public static String doGet(String url, Map<String, String> param) {
        // 创建Httpclient对象
        CloseableHttpClient httpclient = HttpClients.createDefault();
        String resultString = "";
        CloseableHttpResponse response = null;
        try {
            // 创建uri
            URIBuilder builder = new URIBuilder(url);
            if (param != null) {
                for (String key : param.keySet()) {
                    builder.addParameter(key, param.get(key));
                }
            }
            URI uri = builder.build();

            // 创建http GET请求
            HttpGet httpGet = new HttpGet(uri);

            // 执行请求
            response = httpclient.execute(httpGet);
            // 判断返回状态是否为200
            if (response.getStatusLine().getStatusCode() == 200) {
                resultString = EntityUtils.toString(response.getEntity(), "UTF-8");
            }
        } catch (Exception e) {
            e.printStackTrace();
        } finally {
            try {
                if (response != null) {
                    response.close();
                }
                httpclient.close();
            } catch (IOException e) {
                e.printStackTrace();
            }
        }
        return resultString;
    }

    public static String doGet(String url) {
        return doGet(url, null);
    }

    public static String doPost(String url, Map<String, String> param) {
        // 创建Httpclient对象
        CloseableHttpClient httpClient = HttpClients.createDefault();
        CloseableHttpResponse response = null;
        String resultString = "";
        try {
            // 创建Http Post请求
            HttpPost httpPost = new HttpPost(url);
            // 创建参数列表
            if (param != null) {
                List<NameValuePair> paramList = new ArrayList<>();
                for (String key : param.keySet()) {
                    paramList.add(new BasicNameValuePair(key, param.get(key)));
                }
                // 模拟表单
                UrlEncodedFormEntity entity = new UrlEncodedFormEntity(paramList, "utf-8");
                httpPost.setEntity(entity);
            }
            // 执行http请求
            response = httpClient.execute(httpPost);
            resultString = EntityUtils.toString(response.getEntity(), "utf-8");
        } catch (Exception e) {
            e.printStackTrace();
        } finally {
            try {
                response.close();
            } catch (IOException e) {
                e.printStackTrace();
            }
        }
        return resultString;
    }

    public static String doPost(String url) {
        return doPost(url, null);
    }

    /**
     * 请求的参数类型为json
     *
     * @param url
     * @param json
     * @return {username:"",pass:""}
     */
    public static String doPostJson(String url, String json) {
        // 创建Httpclient对象
        CloseableHttpClient httpClient = HttpClients.createDefault();
        CloseableHttpResponse response = null;
        String resultString = "";
        try {
            // 创建Http Post请求
            HttpPost httpPost = new HttpPost(url);
            // 创建请求内容
            StringEntity entity = new StringEntity(json, ContentType.APPLICATION_JSON);
            httpPost.setEntity(entity);
            // 执行http请求
            response = httpClient.execute(httpPost);
            resultString = EntityUtils.toString(response.getEntity(), "utf-8");
        } catch (Exception e) {
            e.printStackTrace();
        } finally {
            try {
                response.close();
            } catch (IOException e) {
                e.printStackTrace();
            }
        }
        return resultString;
    }
}
扫码登录工具类
util/JsonUtil.java
public class MyStringUtil {
    /**
     * 从字节数组到十六进制字符串转换
     */
    public static String bytes2HexString(byte[] b) {
        byte[] buff = new byte[2 * b.length];
        for (int i = 0; i < b.length; i++) {
            buff[2 * i] = hex[(b[i] >> 4) & 0x0f];
            buff[2 * i + 1] = hex[b[i] & 0x0f];
        }
        return new String(buff);
    }


    private final static byte[] hex = "0123456789ABCDEF".getBytes();

    //length用户要求产生字符串的长度
    public static String getRandomString(int length) {
        String str = "abcdefghijklmnopqrstuvwxyzABCDEFGHIJKLMNOPQRSTUVWXYZ0123456789";
        Random random = new Random();
        StringBuffer sb = new StringBuffer();
        for (int i = 0; i < length; i++) {
            int number = random.nextInt(62);
            sb.append(str.charAt(number));
        }
        return sb.toString();
    }
}
1.公网映射
开发的接口需要暴露在公网,微信服务器会进行回调调用。
博主开发中配合使用的是: Sunny-Ngrok内网转发内网穿透 - 国内内网映射服务器:https://www.ngrok.cc/ (需要实名认证、支付宝人脸识别、人脸识别费用一两块钱)
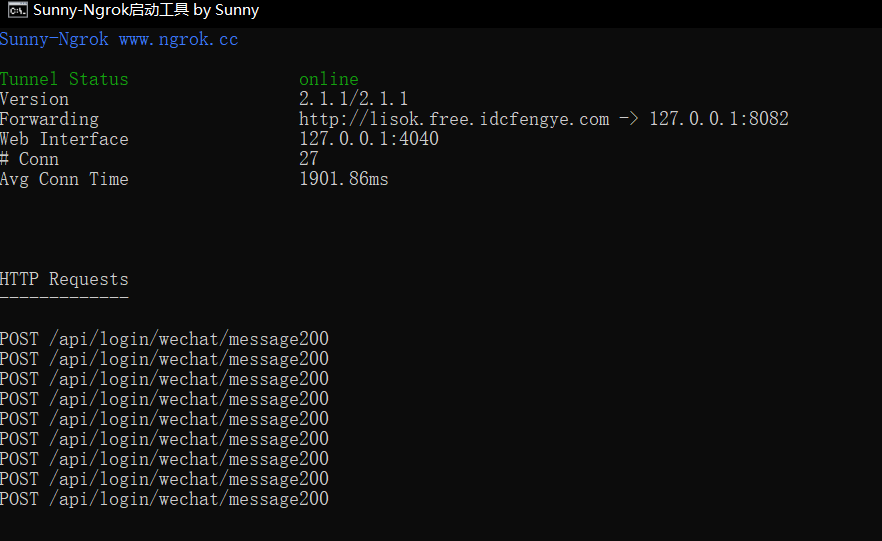
此时访问http://lisok.free.idcfengye.com/就是访问本地的localhost:8082
2.微信公众平台测试号
地址:https://mp.weixin.qq.com/debug/cgi-bin/sandbox?t=sandbox/login
需要记录appID、appsecret

项目中配置application.yml:
#  扫描公众号登录
wechat:
  appId: ...
  appSecret: ...
  qrCodeUrl: https://api.weixin.qq.com/cgi-bin/qrcode/create?access_token=TOKEN
  tokenUrl: https://api.weixin.qq.com/cgi-bin/token?grant_type=client_credential&appid=APPID&secret=SECRET
  # 验签使用的token
token: ... # token 随机填配置类:properties/WxConfig
/**
 * @author Hygge
 * @date 2022/08/13
 * @description 微信登录的一些配置信息 通过读取yml获得
 */
@Component
@Data
@ConfigurationProperties(prefix = "wechat")
public class WxConfig {
    private String appId;
    private String appSecret;
    private String qrCodeUrl;
    private String tokenUrl;
    /**
     * 验签使用的token
     */
    private String token;
}
3.配置微信消息路由器
MP\_微信消息路由器官方文档:https://github.com/Wechat-Group/WxJava/wiki/MP_%E5%BE%AE%E4%BF%A1%E6%B6%88%E6%81%AF%E8%B7%AF%E7%94%B1%E5%99%A8
微信推送给公众号的消息类型很多,而公众号也需要针对用户不同的输入做出不同的反应。
如果使用
if ... else ...来实现的话非常难以维护,这时可以使用WxMpMessageRouter来对消息进行路由。
WxMpMessageRouter支持从4个角度对消息进行匹配,然后交给事先指定的WxMpMessageRouter
作用举个栗子,如果没有消息路由,那么所有的消息各种类型都会集中在一块处理,如文本消息、图片消息、订阅通知、扫码通知、取消订阅通知等。
有了消息路由就可以将属于一类的消息转发给专门用来处理这类消息的路由(Java类)
config/WeChatConfig.java
/**
 * @author Hygge
 * @date 2022/08/20
 * @description
 */
@Configuration
public class WeChatConfig {

    @Resource
    private WxConfig wxConfig;

    @Resource
    private WxMpService wxMpService;

    @Resource
    private TextHandler textHandler;

    @Resource
    private ImageHandler imageHandler;
    @Resource
    private SubscribeHandler subscribeHandler;
    @Resource
    private UnSubscribeHandler unSubscribeHandler;
    @Resource
    private ScanHandler scanHandler;

    // 单例
    @Bean
    @Scope("singleton")
    public WxMpService wxMpService() {
        WxMpDefaultConfigImpl wxMpDefaultConfig = new WxMpDefaultConfigImpl();
        wxMpDefaultConfig.setAppId(wxConfig.getAppId());
        wxMpDefaultConfig.setSecret(wxConfig.getAppSecret());
        wxMpDefaultConfig.setToken(wxConfig.getToken());
        WxMpService wxService = new WxMpServiceImpl();
        wxService.setWxMpConfigStorage(wxMpDefaultConfig);
        return wxService;
    }

    @Bean
    public WxMpMessageRouter messageRouter() {
        // 创建消息路由
        final WxMpMessageRouter router = new WxMpMessageRouter(wxMpService);
        // 添加文本消息路由
        router.rule().async(false).msgType(WxConsts.XmlMsgType.TEXT).handler(textHandler).end();
        // 添加关注事件路由
        router.rule().async(false).msgType(WxConsts.XmlMsgType.EVENT).event(WxConsts.EventType.SUBSCRIBE).handler(subscribeHandler).end();
        // 添加扫码事件路由
        router.rule().async(false).msgType(WxConsts.XmlMsgType.EVENT).event(WxConsts.EventType.SCAN).handler(scanHandler).end();
        return router;
    }

}
handler/TextHandler.java
/**
 * @author Hygge
 * @date 2022/08/20
 * @description 用來處理文本消息的路由
 */
@Component
public class TextHandler implements WxMpMessageHandler {
    @Override
    public WxMpXmlOutMessage handle(WxMpXmlMessage wxMpXmlMessage, Map<String, Object> map, WxMpService wxMpService, WxSessionManager wxSessionManager) throws WxErrorException {
        // 接收的消息内容
        String inContent = wxMpXmlMessage.getContent();
        // 响应的消息内容
        String outContent;
        // 根据不同的关键字回复消息
        if (inContent.contains("游戏")) {
            outContent = "仙剑奇侠传";
        } else if (inContent.contains("动漫")) {
            outContent = "进击的巨人";
        } else {
            outContent = inContent;
        }
        // 构造响应消息对象
        return WxMpXmlOutMessage.TEXT().content(outContent).fromUser(wxMpXmlMessage.getToUser())
                .toUser(wxMpXmlMessage.getFromUser()).build();
    }
}
handler/ScanHandler.java
/**
 * @author Hygge
 * @date 2022/08/20
 * @description 用來處理用戶掃碼登錄的事件
 */
@Component
@Slf4j
public class ScanHandler implements WxMpMessageHandler {
    @Resource
    private UserService userService;
    @Resource
    private RedisTemplate<String, Object> redisTemplate;

    @Override
    public WxMpXmlOutMessage handle(WxMpXmlMessage wxMpXmlMessage, Map<String, Object> map, WxMpService wxMpService, WxSessionManager wxSessionManager) throws WxErrorException {
        log.info("ScanHandler调用");
        // 获取YYYY-MM-DD HH:MM:SS格式的时间
        String content = "您在" + (new DateTime().toString("yyyy-MM-dd HH:mm:ss")) + "通过微信扫码登录PaperFF网站,感谢您的使用。";
        // 获取场景值
        String openId = wxMpXmlMessage.getFromUser();
        // 判断用户是否存在
        User user = userService.getUserByOpenId(openId);
        if (user == null) {
            // 如果用户不存在,则创建用户
            user = userService.createUserByWeChat(openId);
        }
        // 将场景值和用户信息存入redis
        redisTemplate.opsForValue().set(wxMpXmlMessage.getEventKey(), user, 2, TimeUnit.MINUTES);
        return WxMpXmlOutMessage.TEXT().fromUser(wxMpXmlMessage.getToUser()).toUser(wxMpXmlMessage.getFromUser())
                .content(content).build();
    }
}
订阅(关注)的路由逻辑跟扫码的一样。
4.配置消息接口
地址:https://mp.weixin.qq.com/debug/cgi-bin/sandbox?t=sandbox/login

Controller/WechatLoginController.java
/**
 * @author Hygge
 * @date 2022/08/13
 * @description 微信登录的控制器
 */
@Slf4j
@RestController
@RequestMapping("/login/wechat")
public class WechatLoginController {
    @Resource
    private WxConfig wxConfig;
    @Resource
    private RedisTemplate<String, Object> redisTemplate;
    @Resource
    private WxMpService wxMpService;
    @Resource
    private WxMpMessageRouter wxMpMessageRouter;
    @Resource
    private WeChatLoginService weChatLoginService;

    /**
     * 获取登录二维码
     *
     * @return 登录二维码
     */
    @GetMapping("/getQrCode")
    public R getQrCode() {
        try {
            // 获取AccessToken
            String accessToken = weChatLoginService.getAccessToken();
            String getQrCodeUrl = wxConfig.getQrCodeUrl().replace("TOKEN", accessToken);
            // 这里生成一个带参数的二维码,参数是scene_str
            String sceneStr = MyStringUtil.getRandomString(8);
            String json = "{\"expire_seconds\": 120000, \"action_name\": \"QR_STR_SCENE\"" + ", \"action_info\": {\"scene\": {\"scene_str\": \"" + sceneStr + "\"}}}";
            String result = HttpClientUtil.doPostJson(getQrCodeUrl, json);
            JSONObject jsonObject = JSONObject.parseObject(result);
            jsonObject.put("sceneStr", sceneStr);
            return R.ok().put("data", jsonObject);
        } catch (Exception e) {
            e.printStackTrace();
            return R.error(e.getMessage());
        }
    }

    /**
     * 根据二维码场景值获取用户的openId => 获取用户信息
     *
     * @param eventKey
     * @return
     */
    @RequestMapping("/getOpenId")
    public R getOpenId(@RequestParam String eventKey) {
        if (Boolean.FALSE.equals(redisTemplate.hasKey(eventKey))) {
            return R.error("等待用户扫码");
        }
        User user = (User) redisTemplate.opsForValue().get(eventKey);
        redisTemplate.delete(eventKey);
        return R.ok("登录成功").put("data", user);
    }


    /**
     * 微信官方的回调处理
     * 官方文档:<a href="https://developers.weixin.qq.com/doc/offiaccount/Basic_Information/Access_Overview.html">...</a>
     *
     * @param request 微信发送的请求参数
     */
    @RequestMapping(value = "/message", produces = "application/xml; charset=UTF-8")
    public String handleMessage(HttpServletRequest request, HttpServletResponse response) throws Exception {
        //获取微信请求参数
        String signature = request.getParameter("signature");
        String timestamp = request.getParameter("timestamp");
        String nonce = request.getParameter("nonce");
        String echoStr = request.getParameter("echostr");
        if (!wxMpService.checkSignature(timestamp, nonce, signature)) {
            throw new IllegalArgumentException("非法请求,可能属于伪造的请求!");
        } else {
            // 验签通过,直接返回echostr
//            response.getWriter().write(echoStr);
//            return null;
            // 解析消息体,封装为对象
            WxMpXmlMessage inMessage = WxMpXmlMessage.fromXml(request.getInputStream());
            WxMpXmlOutMessage outMessage;
            try {
                // 将消息路由给对应的处理器,获取响应
                outMessage = wxMpMessageRouter.route(inMessage);
            } catch (Exception e) {
                log.error("微信消息路由异常", e);
                outMessage = null;
            }
            // 将响应消息转换为xml格式返回
            response.getWriter().write(outMessage == null ? "" : outMessage.toXml());
            return null;
        }
    }
}
WeChatLoginServiceImpl.java
/**
 * @author Hygge
 * @date 2022/08/21
 * @description
 */
@Service
public class WeChatLoginServiceImpl implements WeChatLoginService {
    @Resource
    private WxConfig wxConfig;
    @Resource
    private WxMpService wxMpService;

    @Override
    public String getAccessToken() {
        String getTokenUrl = wxConfig.getTokenUrl()
                .replace("APPID", wxConfig.getAppId()).replace("SECRET", wxConfig.getAppSecret());
        String result = HttpClientUtil.doGet(getTokenUrl);
        JSONObject jsonObject = JSONObject.parseObject(result);
        return jsonObject.getString("access_token");
    }

    @Override
    public WxMpUser getUserInfoByOpenid(String openId) {
        return wxMpService.getUserService().userInfo(openId);
    }
}
5.前端部分代码
import {request, METHOD} from '@/api/request.js'
import {SCAN_WECHAT_CODE, POLL_WECHAT_CODE} from "@/services/api.js";
import loadQrCode from "@/assets/images/qrcode_loading.gif"
import loseQrCode from "@/assets/images/lose.png"

export default {
  name: 'Login',
  data() {
    return {
      loginType: 'scanCode',
      qrcode: loadQrCode,
      sceneStr: '',
      t: 0,
    }
  },
  methods: {
    toggleLoginType() {
      this.loginType = this.loginType === 'scanCode' ? 'input' : 'scanCode';
    },
    async getQrCode() {
      window.clearInterval(this.t);
      let response = await request(SCAN_WECHAT_CODE, METHOD.GET)
      this.qrcode = 'https://mp.weixin.qq.com/cgi-bin/showqrcode?ticket=' + response.data.data.ticket;
      this.sceneStr = response.data.data.sceneStr;
      // 开始监听轮询
      this.t = window.setInterval(this.getOpenId, 6000);
      window.setTimeout(() => {
        this.qrcode = loseQrCode;
        window.clearInterval(this.t);
      }, response.data.data.expire_seconds)
    },
    async getOpenId() {
      let response = await request(POLL_WECHAT_CODE, METHOD.GET, {
        eventKey: this.sceneStr
      })
      if (response.data.code === 200) {
        window.clearInterval(this.t);
        console.log(response.data.data);
      }
    }
  },
  mounted() {
    this.getQrCode()
  }
}
方式二:登录常见方式
..用到在更新
引用
1.WxJava - 微信开发 Java SDK:https://github.com/Wechat-Group/WxJava
2.微信公众平台 - 测试号管理 : https://mp.weixin.qq.com/debug/cgi-bin/sandbox?t=sandbox/login
3.Sunny-Ngrok内网转发内网穿透 - 国内内网映射服务器 : https://www.ngrok.cc/
4.WxJava微信公众号开发实战:https://baobao555.tech/archives/53
5.springboot前后端分离-使用微信扫码登录(后端):https://blog.csdn.net/xiaoping__/article/details/124258881
6.微信公众平台开发概述 : https://developers.weixin.qq.com/doc/offiaccount/Getting_Started/Overview.html
7.内网穿透工具--Sunny-Ngrok讲解:https://blog.csdn.net/weixin_44563573/article/details/120907527
8.程序员大阳 - 微信公众号开发 :[https://blog.csdn.net/woshisangsang/category_11369636.html](



评论 (0)